Hello, it is me again for another post on how to make sci-kit perform at the top of its game.
Amping up the Model Evaluation process
Model evaluation in sci-kit learn can be achieved by the cross_val_score. This performs repeated stratified K fold resampling and assess the model accuracy across each of those folds. This is done to get a better sense of model representation in the testing data. This is done instead of a simple hold out split, as that is a one-off sample of what the accuracy of the model in the wild is. Normally, these resamples are averaged. However, I am coming at this from the point of optimising the speed of the resamples.
Bring in the necessary imports and available CPUs
This part of the code will look similar to the post on optimising model training:
Please refer to the previous post on what this is doing, as the GPU counts is detailed there.
Create the dataset and fit a ML classifier
This is the same as before, albeit we are fitting a smaller dataset, as this will involve resampling and the length of the training can increase exponentially. Creating the dataset:
I will fit a Random Forest with 100 decision trees. I also do not enact parallelism at this stage.
Create the function for optimising the cross validation scoring
The function hereunder will be explained in depth under the code block:
- strat_cv – states that we want to undertake repeated stratified K fold resampling – the n_splits relates to the K parameter of the folds and the number of repeats says I want 10 splits, but I want to repeat each 3 times.
- start – this is the current time and will stored when this variable is assigned and created
- model_result – this is the main part of the function and this is the function we are going to make parallel:
- model parameter – this is the model we fitted prior
- X – the independent variables dataset, or array
- Y – the dependent variable array
- cv – this is the strat_cv method
- n_jobs = workers – this will be what we iterate over to look at the performance of the models
- end – the end time
- result – how long the model ran in seconds. For long processes this might need to be converted to minutes/hours to provide more sensible feedback
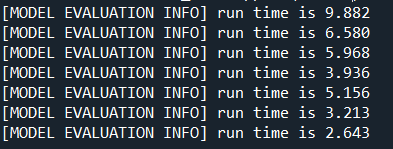
- The function prints out the run time of the model
- The return statement outputs a list containing the result i.e. how long the model took to run and the model_result that is actually the specific fitted model.
Benchmark our function with multiple workers (cores)
Finally, we are going to call the function every time we loop through the cores. This time I have used list comprehension to make this dynamic, as it will output a range of values from 1 to the number of CPUs you have on your machine:
- results_list – an empty list initialised
- cores – list comprehension through a range of values from 1 to the number of CPUs we have on our machine
- The loop:
- creates an object called cv_optim. This is the model called each time the loop iterates and the number of workers is incremented by one
- result – this is the run time from the list at index 0
- The final result gets appended to the empty list until the loop terimates
Running this code triggers the below and the appropriate message will be sent to the console:
Visualising the results
The last step is to work with matplotlib. This uses the function we created in the first tutorial, contained below for reference:
To use this function:
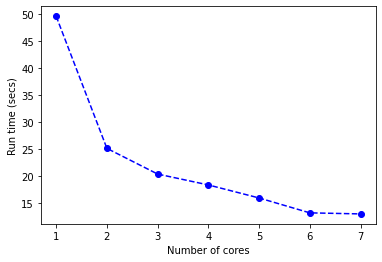
This produces the plot illustrated hereunder:

At 7 works performing the repeated cross-validation process, we can quickly perform this process.
The code for this section can be found on the associated GitHub.
Tuning those hyperparameters faster
This part of the tutorial looks at hyperparameter tuning in models. We are going to use the max_features attribute of the random forest to optimise. This process, especially via custom grid searches can be optimised and parallelized effectively. Here is how to become a parallel wizkid!
Setup, dataset creation and model training
Here, we will use the same settings and classification created in the above tutorial on model evaluation.
Setting up the Grid Search
This code will set up the grid search dictionary, as the hyperparameters in sci-kit learn are in dictionary data structures:
We create the cv variable that will be used for the resampling method. The grid is initialised as an empty dict() structure. I add a field called max_features onto the grid and I will specify how far to go down in each tree of the random forest.
Create the grid search function
The next step is to create our grid search function that will fit the model, perform tuning and time the whole process:
To explain what the function is doing:
- the first step is to print out the grid search has been started
- grid_search – this is the driver of the model and uses the model, the grid we created in the previous step to tune on max features in the random forest, this would change dependent on the tuning routine
- start – the timer initialisation of when the start variable was set
- grid_search_fit – fit the grid_search method to the features and the predicted variable
- end – the final time stamp at the end of the process
- finish_time – the elapsed time when running the routine
- prints out the time of execution to the console
- returns the grid_search object and the finish_time in seconds. These are stored in a list structure.
Performance comparison by the number of cores
We will now replicate the benchmarking steps we previously coded:
This performs the same routine as we have coded, the only differences is that it calls the grid search and runs the search by a different number of worker ants:

Visualising the Grid Search results
I am not going to reimplement the function we created at the start of the tutorial, but I am going to use it for this example:
This gives you the plot of the grid tuning process:
The tutorial code for this part can be found on the associated GitHub.
To end this parallel madness
If you have a use case you need help with just reach out. I would be interested to help.
I hope you enjoyed these two tutorials. It has been: