
This post will use an old image of my house before I bought it, and remodelled the living room, to see how this model could be used to make suggestions on how it could be further remodelled. We will be using a suite of pre-trained ControlNet models, trained on hours of GPU time, to then fine tune these with a HuggingFace prompt.
What is the ControlNet framework?
ControlNet is a neural network structure to control diffusion models by adding extra conditions. This checkpoint corresponds to the ControlNet conditioned on Normal Map Estimation. This can be used with Stable Diffusion, as I have posted about previously, to perform a number of different tasks.
The underlying framework coresponds to the associated network diagram:
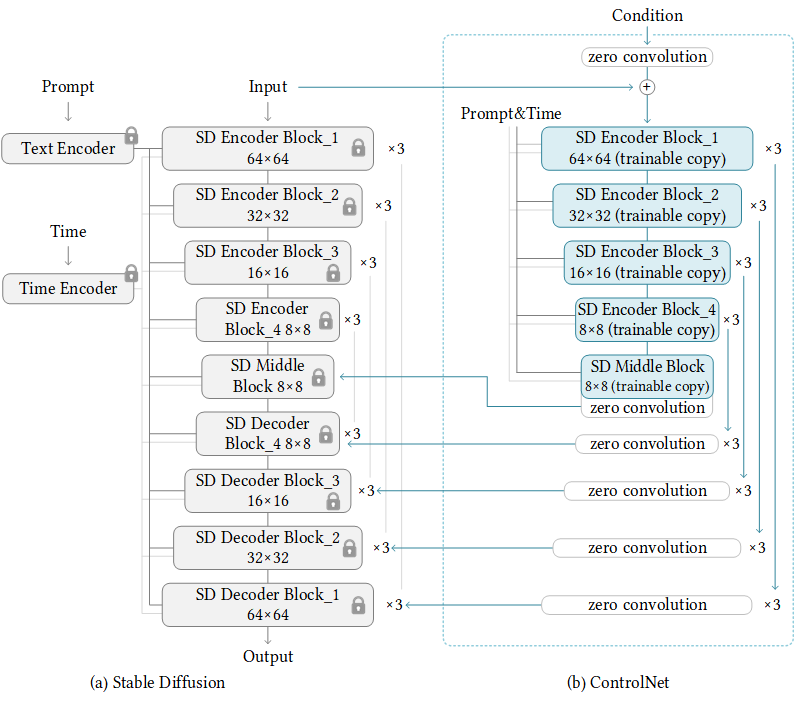
The ControlNet learns task-specific conditions in an end-to-end way, and the learning is robust even when the training dataset is small (< 50k). Moreover, training a ControlNet is as fast as fine-tuning a diffusion model, and the model can be trained on a personal devices. Alternatively, if powerful computation clusters are available, the model can scale to large amounts (millions to billions) of data.
The benefit of this model is that you can control the fine tuning process to enable image processing tasks such as semantic segmentation, edge detection / mapping, keypoints, canny edge detection and other image processing techniques that are made available via opencv-contrib package for cv2 in Python.
The list of models and use cases is captured in this table hereunder:
| Model name | Model purpose |
|---|---|
| lllyasviel/sd-controlnet-canny Trained with canny edge detection | A monochrome image with white edges on a black background. To detect edges in the images to get the image outline. See https://docs.opencv.org/4.x/da/d22/tutorial_py_canny.html |
| llyasviel/sd-controlnet-depth Trained with Midas depth estimation | A grayscale image with black representing deep areas and white representing shallow areas. Midas depth estimation is outlined here: https://pytorch.org/hub/intelisl_midas_v2/. |
| lllyasviel/sd-controlnet-hed Trained with HED edge detection (soft edge) | A monochrome image with white soft edges on a black background. This is explained in the excellent PyImageSearch blog post: https://pyimagesearch.com/2019/03/04/holistically-nested-edge-detection-with-opencv-and-deep-learning/. |
| lllyasviel/sd-controlnet-mlsd Trained with M-LSD line detection | A monochrome image composed only of white straight lines on a black background. M-LSD line detection explained here: https://arxiv.org/abs/2106.00186. |
| lllyasviel/sd-controlnet-normal Trained with normal map | A normal image trained with normal map. |
| lllyasviel/sd-controlnet_openpose Trained with OpenPose bone image | A OpenPose bone image. This is linked on the hyperlink. |
| lllyasviel/sd-controlnet_scribble Trained with human scribbles | A hand-drawn monochrome image with white outlines on a black background. Converts a scribble or drawing into an image, using the diffusion model backbone: https://paperswithcode.com/dataset/scribble. |
| lllyasviel/sd-controlnet_seg Trained with semantic segmentation | Semantic segmentation model to highlight objects in an image. The segmentation method – see link for an overview of semantic segmentation in PyTorch: https://learnopencv.com/pytorch-for-beginners-semantic-segmentation-using-torchvision/. |
We will use the semantic segmentation and line detection methods, to fine the instances of objects in the room to then force the stable diffusion model to generate objects that it thinks match the input prompt, as stable diffusion is a prompt to image paired embedding, similar to DALLE-2 (proposed by OpenAI).
Starting with Semantic Segmentation Controlnets
The first thing we will do is start with a pre-trained model, that has enough GPU hours and images trained on, these have just been made available by the excellent lllyasviel (thanks for making these available on HuggingFace).
The first step we will work on is getting the image of the living room to remodel, you could use your own image here.
The image to use
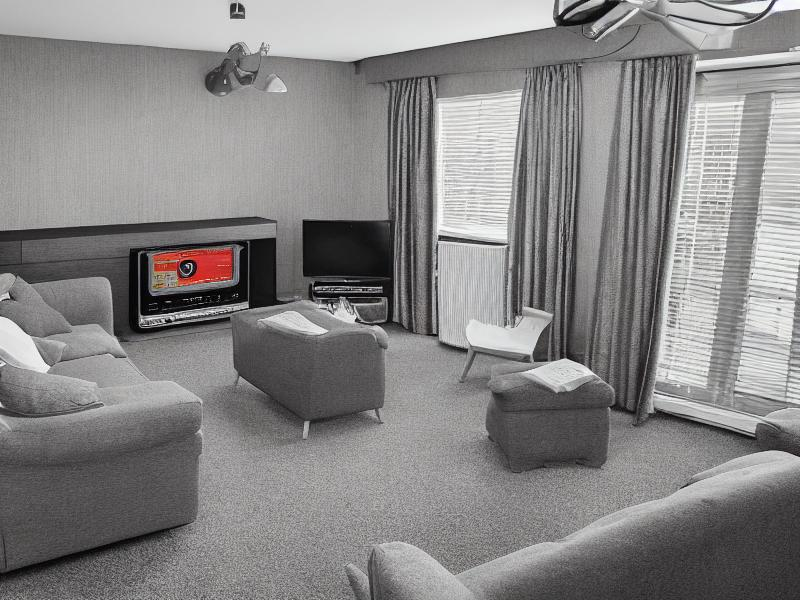
I will be using an image of my property acquired from Zoopla (a property website in the UK) to show you what this looked like before we actually remodelled the house, as this house has been a money pit, and more or less every room needed to be remodelled. The living room looks like this:
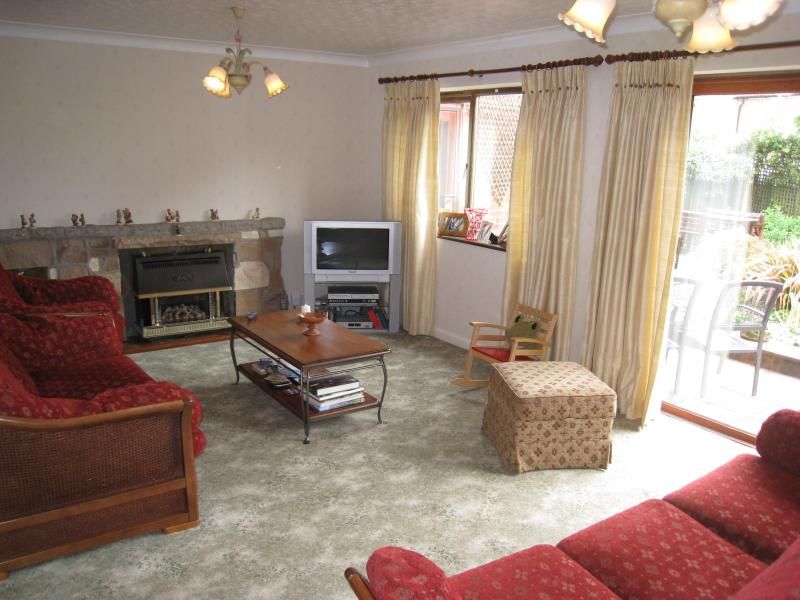
My old front room
For you judgemental people out there, yes you, I know this is a little old fashioned and primed for remodelling. In the next steps we will explain how the class I developed works.
Deconstructing and understanding the Semantic Segmentation class
Now to get to the fun part. Firstly, we will explain the __init__ block of the class and then I will explain the class method and how this works.
The __init__() method
When we initialise a class, these are the actions that will be performed when the blue print is constructed. These are also known as class constructors. The implementation of the init constructor is explained hereunder:
There is quite a bit to unpack here, and because I am nice, I will break it down bullet by bullet:
- The parameters for the init are
prompt(this is the prompt you would like to use to generate your images, this relies on the Stable Diffusion backbone model, that is commonly used for most of these tasks); then we take inimage_path(this is the path to the stored image you want to use for the diffusion process;image_processoris next, which is the segmentation pretrained model we will be using for the semantic segmentation process and finally we have the pretrained stable diffusion model - Next we assign the class variable instance of the paths for the images and the matching pretrained models
- For the
image_processorandimage_segmentvariables, we use thefrom_pretrainedconvention in HuggingFace to bring back the matching strings of the pretrained models - Towards the end we use
torchto check whether there is a GPU present (as these models rely on GPU engines to process the information, therefore is they are unavailable, then the model will error out). This is the same as saying to run these examples you need a GPU or to do this in a Google Colab Notebook. - At the end of the init block, we use an
assertstatement to check that theimage_pathis a string data type.
That concludes the constructor (init) block of code. Next, we will work on our class method (this will be the doing component of the class, as up to now we have just developed class attributes and variables).
Our segment_generation class method
There are are couple of steps to this, therefore I will loop through them one-by-one:
Okay, strap yourself in for this one:
- This method takes in the parameters
save_segmentation_path(defaults to None),save_gen_path(defaults to None) andnum_inf_steps=50(this is the number of steps through the controlnet network, here the higher number of steps, the better the generations from the model). - First, we open the image that is passed in our
image_pathparameter, using theImage.open()function from the PIL (Pillow) library and covert the image to an RGB colour scheme - Next, we use our image processor to store the image as a PyTorch tensor (return_tensors=’pt’) and we grab the pixel_values from that tensor
- We then use
torch.no_grad()with a context manager to turn off the gradient updates to the network for inferencing. Here, we segment the image and perform our semantic segmentation step - After that, we use a dense matrix
np.zerosto pass in the segment colours based on a palette into the color_seg variable. - The palette is specified, which is essentially an array of RGB values that match the colour segmentation of the semantic segmentation model we are using
- Then, we loop through our palette and set the colour segments to the matching RGB triplets
- Once we have set the palette styles of we then create an image out of the segmentation using
Image.fromarrayand pass in thecolor_segvariable - We add an if statement into the mix to check that if the parameter
save_segmentation_pathis not null i.e. it has a value matching that parameter in text, then we use theimage.save()method to save it to our local path
At this point, go away and grab a coffee, and then I shall delve back in. What we do next is:
- Load our pretrained ControlNet model, again using the
from_pretrainedmethod for quickly grabbing pretrained models from HuggingFace. The same process is repeated for the Stable Diffusion model - Then we set some parameters in the pipe scheduler around the level of random noise, and other parameters to use from the model config files
- We then make sure that we are being as efficient with GPU memory allocation as possible using the xformers package to optimise the attention heads in the model and enable the model to be offloaded to our CPU
- The HuggingFace
pipeparameter is used to fine-tune our example image, this being the segmentation map. This compares the images to the prompt, and uses the stable diffusion model to generate similar shapes to the input image (the segmentation map) - Finally, if we want to save our generation, then we use the parameter
save_gen_path. This will store a local copy of the image that it has generated.
The full class code, is contained hereunder:
Using our class to model the living room
The code below shows you how to define the class and use it:
Again, let’s delve into the code:
- The
promptis the text of the image you want to generate via the stable diffusion model - The
img_pathis the source image – mine is saved in a folder called images control_net_segis the instance of theControlNetSegmentclass we created above. With this class we pass in the prompt to use and the image path, of the source image- Next, we use the class method
segment_generationto take all the information we provide at the point of initialising the class, and then uses this information to perform the generation. The two parameters of thesegment_generationmethod that allow you to store both the segmentation image and the generated image are then specified in the code. Heading to my images folder i should see two new images generated for me – one containing the segmentation of the image and the other one the generation.
This is what the segmentation output looks like:
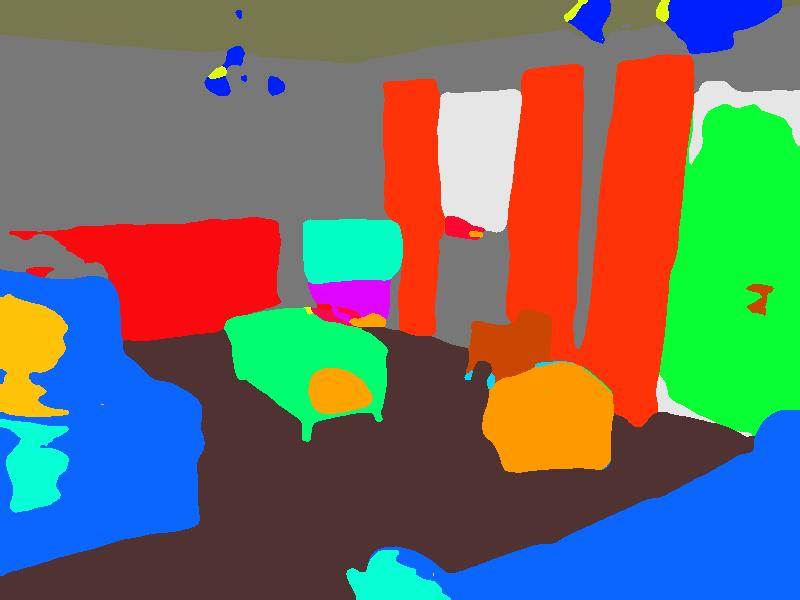
The image presented is then fed into the diffusion model and this generates text / image generations based on the input prompt. What I love about this is you can get really creative, based on our initial prompt we store the image of the living room with grey carpet and modern fireplace, this generates as below:
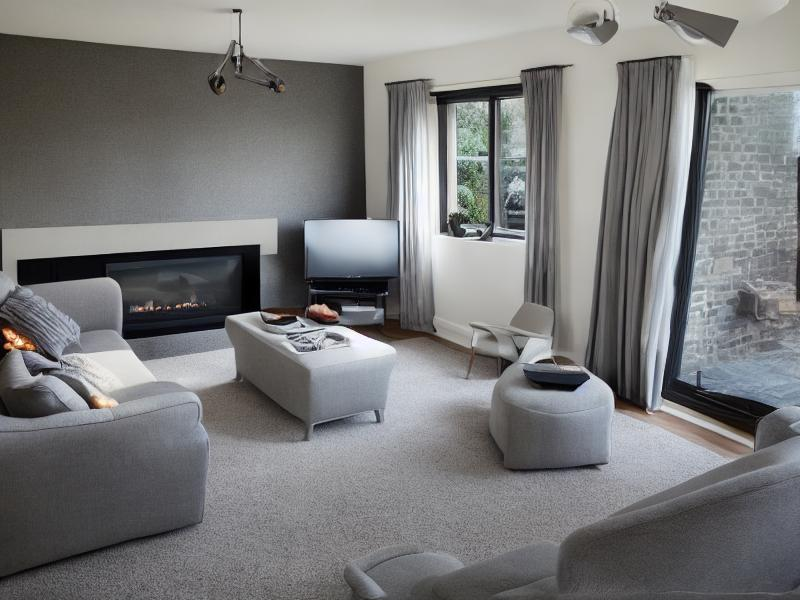
It actually does a nice job of using the inside of my old living room and projecting what it thinks a good design would look like. You could have even more fun and start creating some whacky designs.
Using the prompt living room with grey carpet and jukebox in the corner gives us:
I mean – from a design perspective – not quite there, but you can see that you can convert an existing room with our segmentation map easily.
Next up, we will look at another method for doing this, using MLSD line detection, which is a lightweight framework for segment detection.
Using MLSD line detection – a lightweight alternative to semantic segmentation
The class for this is much simpler, and this method provides an alternate method of detecting the objects in a room.
The __init__ block
We will use the same imports as the previous example, and the __init__ block of the class looks very similar to what we had before:
The major difference with this is that it uses a mlsd stable diffusion pretrained model and the line detection model pretrained by one of the founding members of ControlNets (lllyasviel/ControlNet). The rest of the parameters are the same as we saw in the previous class.
Next, we define the class method for this approach:
The class method
Let’s explain this method:
- We set our class variables using the self method (meaning for the current instance of that class)
- We load in the image, this time using a prebuilt loading package
load_imageavailable in the diffusion model HuggingFace package diffusers - We then link to the
__init__method to grab theMLSDdetector.from_pretrained()and pass in the image we want to use - Then, to save the image, we add a path to save the mlsd image, using the variable
mlsd_image_path - Grabbing the pretrained networks for controlnet and stable diffusion is the next step and tweaking some pipe scheduler settings, as we did in the previous tutorial
- We then set the prompt, print a generation message and use the
pipemethod again to fine tune the model on our mlsd detected lines and use the prompt to get creative and use the power of the stable diffusion model to propose generations. - Saving the generation is next, if we want
- Finally, we return the generated image from the class. Then, hey presto, we have created another method
The full implementation of this class, is here:
Using our MLSD line detector
We will use this, as we did before, in our if __name__=='__main__' block:
The MLSD line detector works and outputs the tracing of the image provided:
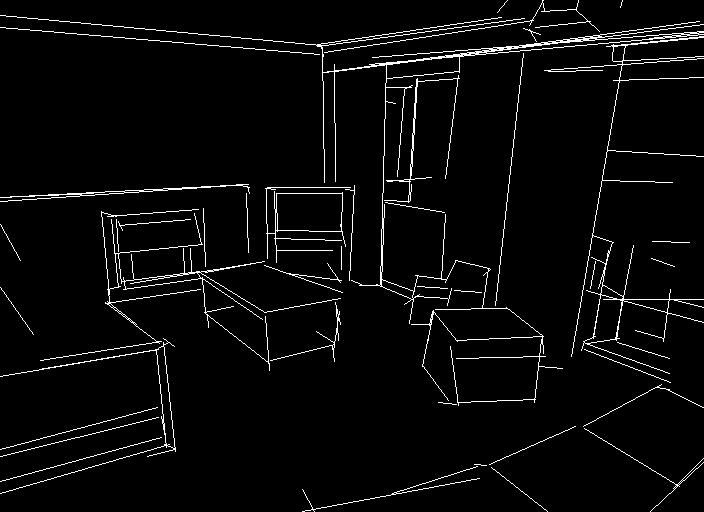
We will use this as our reference for our diffusion model, when prompting. The model generates the tracing of this, and may even do a better job than the segmentation approach. It is hard to tell, as the prompt is different for this example:
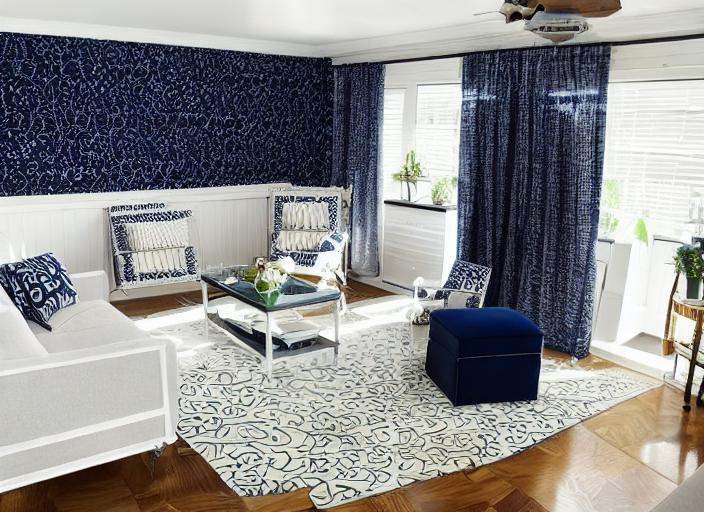
Wow, it has got some style, and it does a great job actually.
Closing up
This is the first of a few tutorials I will do on the excellent controlnet and the associated packages with HuggingFace. Look out for further tutorials.
The supporting code for this tutorial is available via this link: ControlNet repository.
Until then, be unstable with your diffusion!